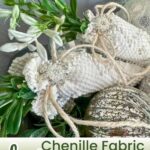
How to Make Chenille Fabric Carrots
If you’re looking for a simple, neutral Easter craft that adds just the right touch of cozy charm, these chenille fabric carrots are going to be your new favorite spring DIY!
Materials
- Scrap chenille fabric or any soft, textured fabric
- Fabric scissors
- Hot glue gun and fabric glue sticks
- Poly fill or cotton stuffing
- Twine
- Faux greenery I used Dollar Tree sprigs
- Optional rhinestone bling for a little sparkle
Instructions
Step 1: Cut Your Fabric
- Cut your chenille fabric into a triangular shape—this will be the body of your carrot. The size is totally up to you depending on how big or small you want your fabric carrots to be. Taller triangles will make longer carrots; wider ones will make shorter, chubbier ones.
Step 2: Create the Cone Shape
- Line one edge of the triangle with a thin bead of hot glue, then carefully fold the fabric over and press the opposite edge into the glue to form a cone or carrot shape. Hold it in place until the glue sets.
Step 3: Fill the Carrot
- Stuff your fabric carrot with poly fill to give it some shape and fullness. You can use as much or as little as you'd like depending on how plump you want the carrot to be.
Step 4: Add Greenery and Twine
- Take a few sprigs of faux greenery (I snipped mine from a Dollar Tree bunch) and bunch them together. Use baker’s twine or regular twine to tie them off at the bottom with a little knot. This will act as the carrot “top.” Tuck it into the top opening of your carrot and secure it in place with hot glue.
Step 5: Add a Bit of Sparkle (Optional)
- If you want to give your chenille carrots a little extra personality, glue a small rhinestone or embellishment to the top where the greenery meets the fabric. It adds just the right amount of shimmer without taking away from the cozy, neutral vibe.