Easy DIY White Pumpkins With Succulents
This blog post contains affiliate links. The opinions are wholly my own from my own experience. I may earn a small commission from clicks through to the websites that end in a purchase.

Follow along with me as I show you how easy this one really is.
Be sure to pin this for later!
How To Put Succulents in White Pumpkins
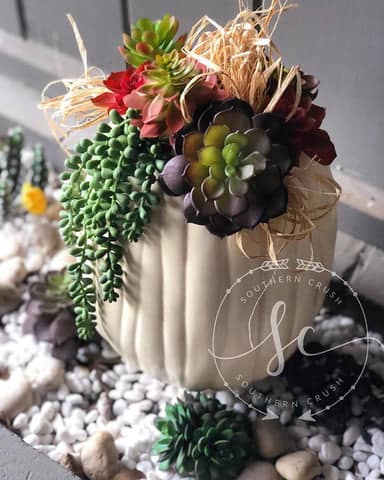
I want to start by saying that this was by far the simplest and easiest DIY project I’ve ever done that turned out so gorgeous!
It turned out looking like something you’d buy at the florist. I’m pretty proud of it – and you’ll be proud of your creation too when you are done with it.
Supplies for Faux Succulent Pumpkins
Here is what I used in my fall decor. You can buy all of the supplies either at your local craft store or from Amazon.
- Creamy white craft pumpkin – any size works
- Colorful faux succulents – you can get yours from Amazon here along with the rest of the project materials from the comfort of your own couch
- Raffia
- Drill – you can use a knife or screwdriver
- Brown marker
So, I knew real succulents we’re never going to do for my “black” thumb. I don’t know why I have such bad luck with keeping plants alive—even the easiest ones like cactus and succulents die on my watch. So it was “faux” for the win!
There is just something about an easy DIY pumpkin that gets me excited for fall! Any color faux pumpkin will work, but I especially love this creamy white pumpkin.
Scroll-stopping, beautifully colored succulent pumpkins are all over the internet; however, I decided to create a unique version of them for myself! As true to form, this decor project was a sort of “make it up as you go” creation—and I love it!
Pumpkin and Succulents Decor Tips
The entire craft is written out in easy steps in a printable craft card at the end of this post. First, I’m going to explain some tips and things I learned when I did this craft. If you have any questions, let me know in the comments. I’d love to answer them!
Add Depth to the Pumpkin
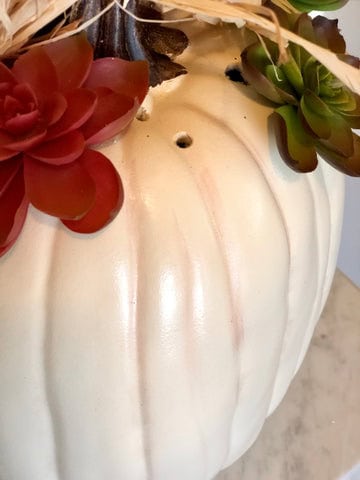
I tried making the pumpkin a little unique by adding depth with a brown Crayola marker drawn down each of the seems of the pumpkin and then quickly wiped off to create a shadowing a fact. This worked out great!
If you don’t have a brown marker, you can also make this same effect with some brown paint. It’s also totally fine to just leave this step entirely off. Even though it adds a little extra something to the project, it’s definitely not essential.
Drill Holes in the Pumpkin
Then I proceeded to make the holes in the top of the pumpkin staying near the top of the crown area. I used a small drill to make the holes; however, it would’ve been just as easy to use a screwdriver or some other sort of sharp object to make the holes. Here you can see the holes and hopefully, the brown lines I made with a marker.
Stick the Succulents Inside the Holes
Then, I simply proceeded to poke the succulents down into the pre-made holes and arrange them until I was satisfied with the way they looked. The dripping fernlike succulent down the side of the pumpkin was perfect for adding style and texture. The best part about this step is that if you feel like there are any spots that need more succulents, you can just poke a few more holes into the pumpkin.
Top with A Bow
Finally, I added a raffia bow to each side of the top of the pumpkin to fill in any void spaces and cover up the stem. I personally think that the raffia is the perfect touch for a rustic topper. Be creative and use any topper that you like. Here are a few ideas that came to me, but don’t stop here, use your own materials.
- Burlap
- Ribbon
- Rope
- Crochet a bow
- Pom Poms
Easy Pumpkins and Succulents Decor
Here’s the printable craft card, just like I promised! Print it out or pin this post so you can find it later!

White Pumpkin and Succulents Decor
Equipment
- Drill
- Brown Marker
Materials
- ½ yard Raffia
- 1 Faux craft pumpkin
- 6 Faux succulents
Instructions
- Draw brown circles on the pumpkin and wipe them away. This will create depth and a shadowing effect.
- Drill holes into the faux pumpkin.
- Place the succulents into the new holes.
- Tie raffia around the stem.
Where to Display It
Depending on the size of the pumpkins you use, you can display this on your mantle, dining room table, or on your desk.
I personally love that every part of this craft is plastic! That means I can place a bunch of them on my front porch and not have to worry about the weather ruining them.
This also makes a thoughtful fall gift for a hostess, birthday, or even to say you are just thinking of someone.
How To Personalize The Pumpkin
Do you have a Cricut or other cutting machine? Use it to apply a vinyl monogram! Talk about elevating a craft into something seriously thoughtful and unique.
Even if you don’t have a cutting machine, you can use stencils and paint the monogram.
You can also spray paint the pumpkin to match your fall decor colors. Honestly, the options are endless!
More Easy Fall Craft Projects
The succulent pumpkin project was complete. There so many variations of this project it makes my head spin; however, I am in love with mine. What do you think?
I also made a braided pumpkin out of Dollar Tree materials. You might also really like making my DIY splatter screen pumpkin.
If you love this kind of DIY project, you need to be getting my emails, friend! Each week I send out a couple of emails that include updates, crafts, shopping experiences and decor inspiration. Be sure to get yourself signed up below. I can’t wait to meet you!
>>Leave your thoughts below in the comments please… BTW— Life is short—Enjoy the mess!
Love the pumpkin idea
Such a beautiful pumpkin.
I will try to find a plastic pumpkin and hopefully it will be as nice as yours.
I absolutely love this idea!
Another suggestion- if people don’t have an offwhite/ beige pumpkin, you can paint one beige and while it’s still a little wet, rub flour on it and dust off to get a cool plaster/ chalky effect. Let dry and continue with decor.
Such a great idea! Thank you for sharing!