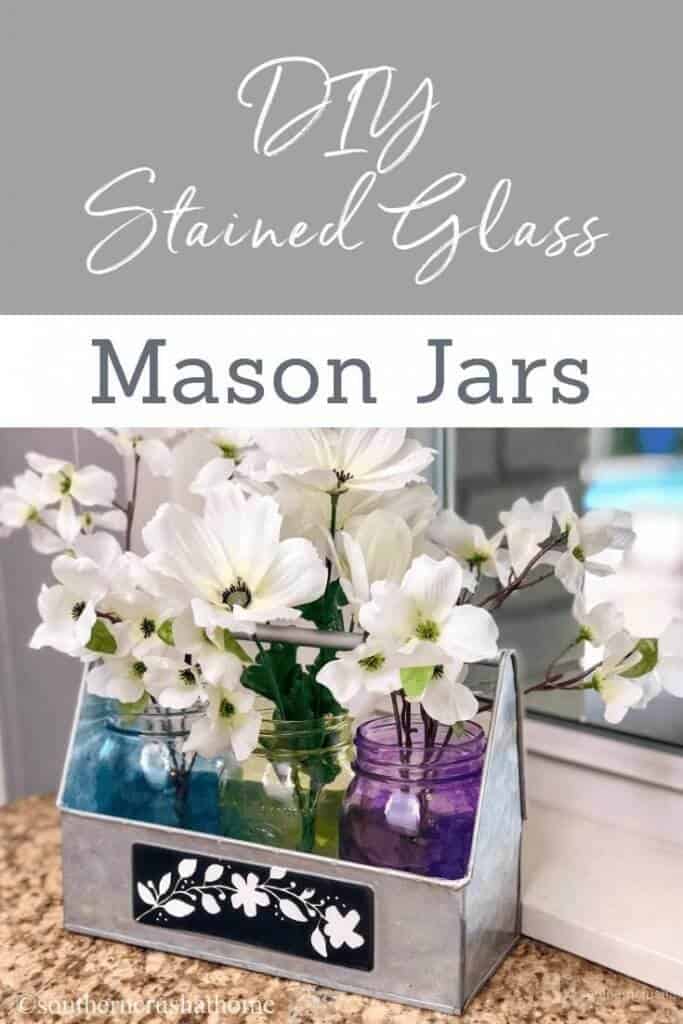
Painting Glass Jars – DIY Stained Glass Mason Jars
Painting glass jars are super easy to DIY when you follow my tutorial! Learn how to make your very own stained glass mason jars for farmhouse chic decor.
I’ve always loved the way pretty colors in stained glass shine through in vintage windows and churches when the sun hits them just right. When I found out that there was an easy alternative to making these pretty colors come alive, I was super excited! Mason jars were what I had on hand and they quickly became my version of a DIY stained glass mason jars project!
Ya’ll, don’t forget to pin this project for later!
Painting Glass Jars: The Easy Way
I love using mason jars in my home decor. There are so many creative ways you can decorate them and use them around your home! One of the easiest ways to decorate the mason jars is to paint them different colors.
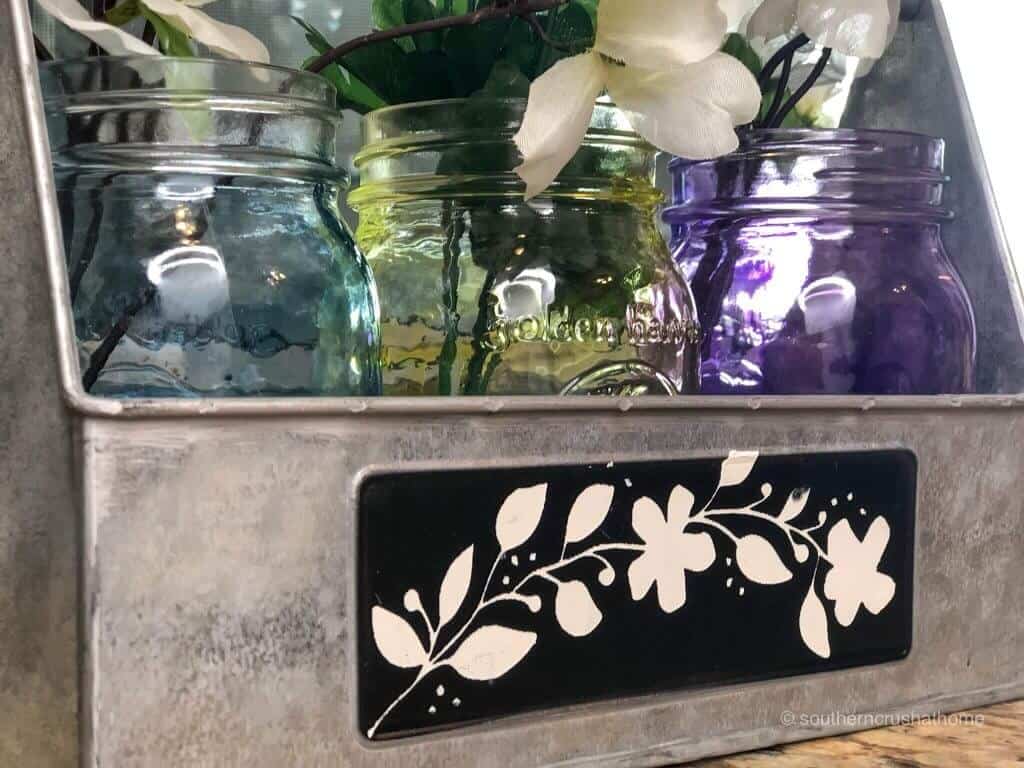
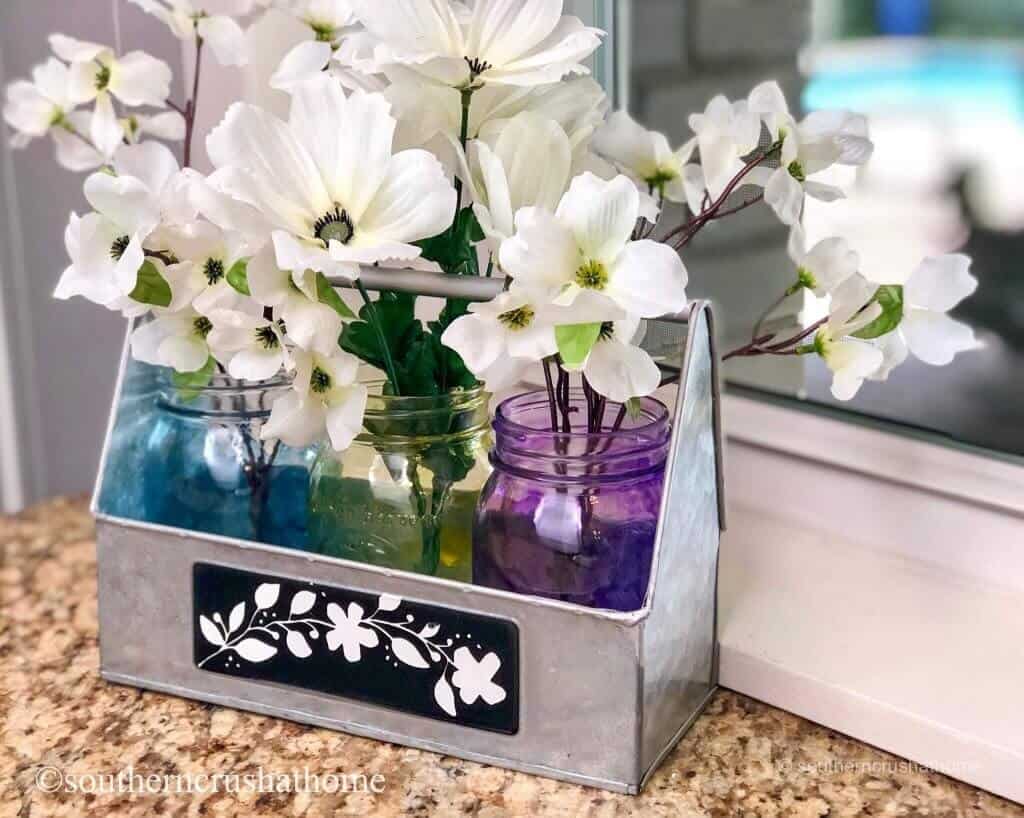
Don’t you just love how the purple, blue, and green jars look? They remind me of a stained glass window when I put them together.
I discovered a really easy way to completely cover the mason jars in the color of my choice, and I’m thrilled to share the tutorial with you today. I’ll share tons of photos of each step, and a video at the end.
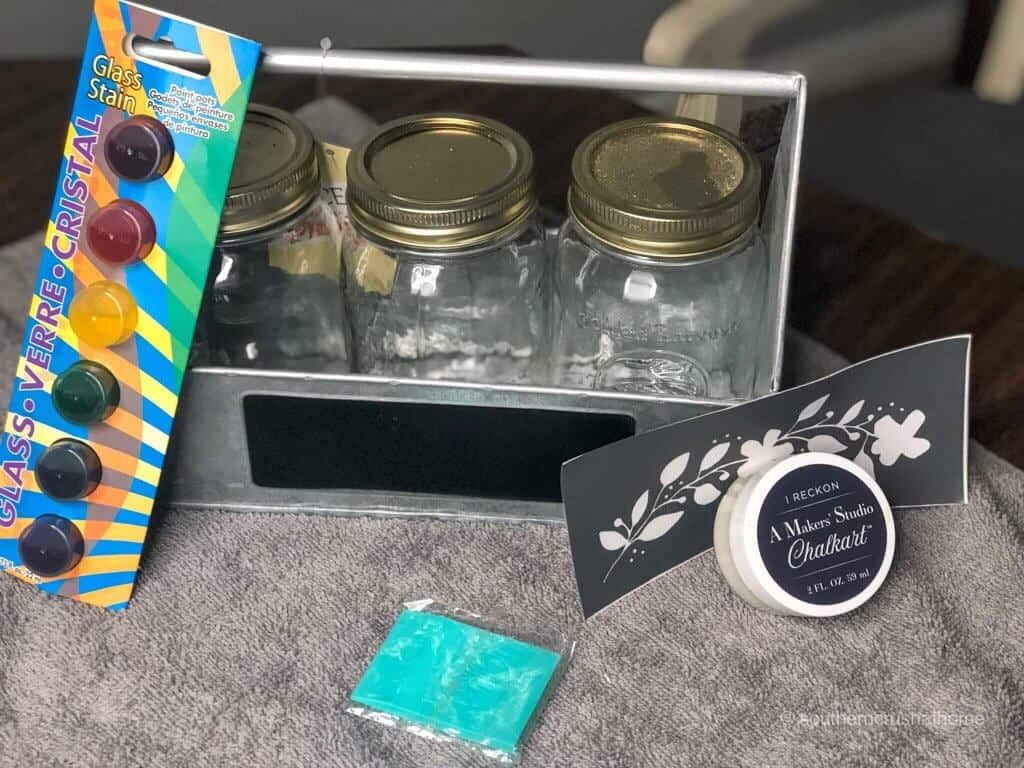
Here is the list of supplies you will need for this project.
Supplies for Painting glass jars
- mason jars
- gel stain for glass
- blow dryer
- floral stems
- chalk paste and stencil
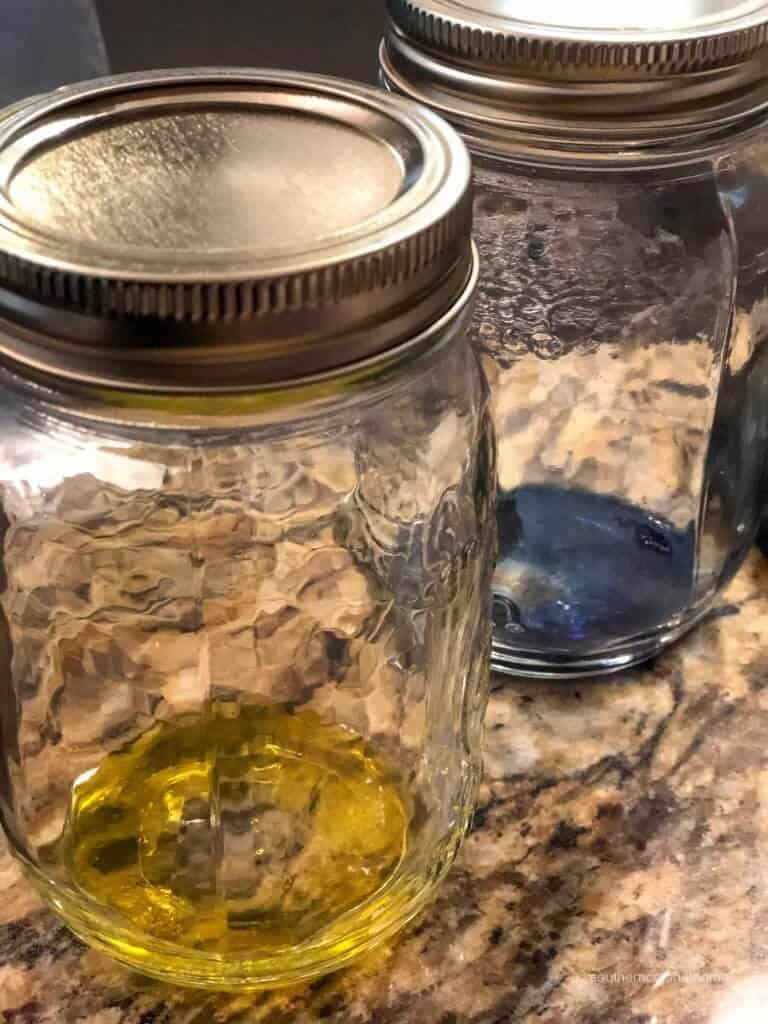
1. Put Glass Stain in the jars
First, place a few drops of your desired stain glass gel stain color into the bottom of your glass container and swirl it around. As you can see in the photo below, you don’t need very much stain; just enough to basically cover the bottom of the jar.
2. Tip the Jars Upside-Down
Next, lie your container upside down until the stain coats the sides. This part takes a lot of patience, but it’s definitely possible. Make sure you have lids on the jars or else it will ruin your countertops.

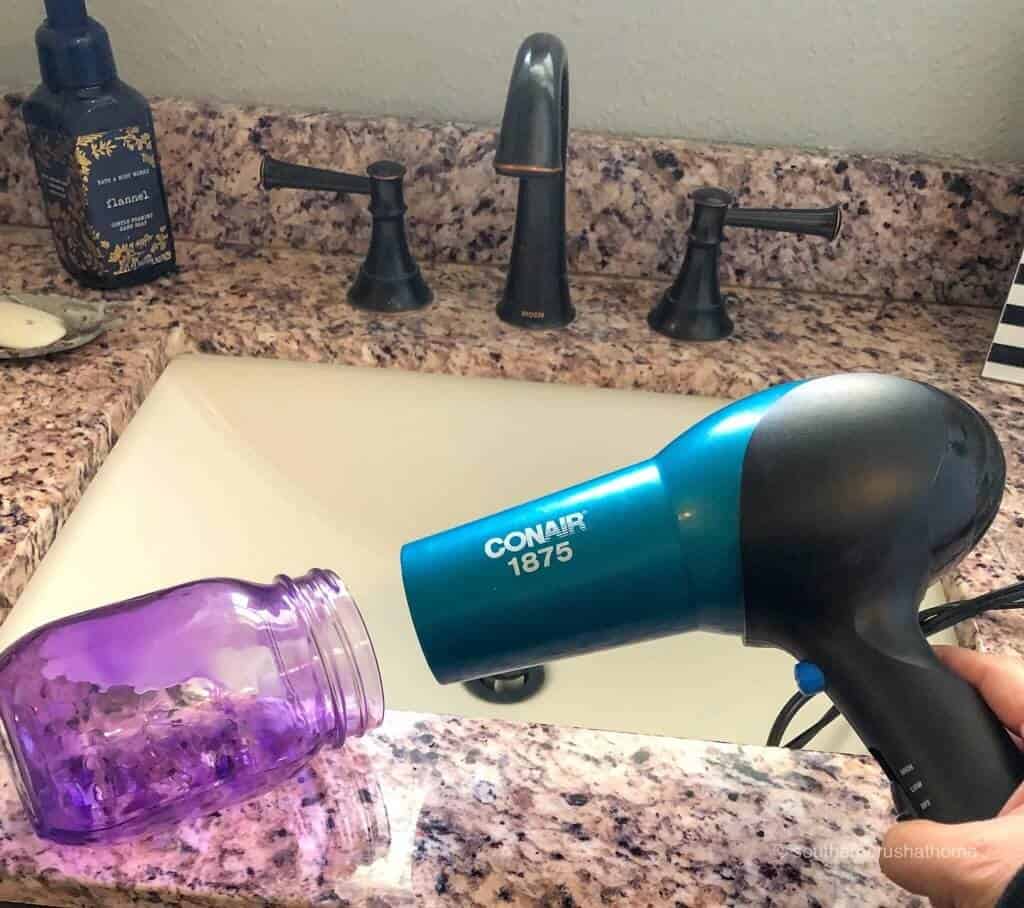
3. Dry the inside of the jar
Use a blow dryer to help dry your stain to the sides of the jar; otherwise, it seems to slide right off as quickly as you coat it. I do this step as soon as the entire jar looks like it is coated in the glass stain.
4. Decorate With Your Painted Jars
After they are completely dry, you can use them in your home decor. Arrange in a container of your choice. I chose this farmhouse style galvanized tote and added a little stenciling to the front for embellishment.
Additionally, I chose to add some spring floral picks to the jars themselves!
WATCH THE Live Video Tutorial
What To Do With Painted Glass Jars
Who knew making your own version of stained glass was so easy! This DIY turned out super cute for a spring project to use for displaying some summer stems with added color. Let me know how you end up using this idea for your own projects!
Here are a few more ideas and ways you can use your painted glass mason jars.
- DIY Gift – Fill it with candy or instant coffee packets and give it to someone special as a birthday or thank-you gift.
- Seasonal Decor – Change the florals inside the jars to match the current season.
- Tea Lights – Place electric tea lights in them to cast colorful soft light around your room.
- Office Supply Organization – Fill the jars with pens, pencils, or paintbrushes in your home office.
- Bathroom Decor – Fill them with seashells and place them in your bathroom.
More Ways to Tint Mason Jars
Even though I think the glass stain is the easiest method for painting glass jars, I found lots of other methods that work just as well. All of them give the glass a slightly different look and feel.
Try them all and use the one that feels the most natural and fun for you! Crafts are all about enjoying the mess!
- Mod Podge & Food Coloring – Six Sister’s Stuff has this tutorial. You are basically making your own glass stain out of mod podge and food coloring, it’s pretty simple.
- Use Multiple Colors in One Jar – Whether you use actual glass stain or food coloring and Mod Podge, if you pour a few different colors in the mason jar, it will create a swirly look. It’s fun and takes a bit more focus and effort – but it’s worth it.
- Use Martha Stewart’s Glass Paints – This look actually comes out resembling sea glass.
- Use Spray Paint – This look is incredible and a lot less opaque. Liz Marie used a sea glass spray on the outside of the glass instead.
- Decorate With Acrylic Paint – Check out the tutorial on Kenarry. This method requires you to cure the glass jar in the oven afterward. It comes out looking stunning and vibrant color.
More DIY Home Decor Ideas
The galvanized tin caddy and floral stems worked great with this project. It reminds me of another one of my favorite floral arrangement ideas here – Game Night Centerpiece.
Here are some more of my favorite DIY home decor ideas. Make some more projects for your home, it’s so much fun!
If you love this kind of DIY, you need to be getting my emails, friend! Each week I send out a couple of emails that include updates, crafts, shopping experiences, and decor inspiration. Be sure to get yourself signed up below. I can’t wait to meet you!
DIY Stained Glass Mason Jars (Painting Glass Jars Project)
Materials
- mason jars
- gel stain
- blow dryer
- floral stems
- chalk paste
- stencil
Instructions
- Clean your glass jars thoroughly. Let dry completely.
- Add a few drops of the glass gel stain into the bottom of the jar and swirl it.
- Place a protective surface down and flip the jar upside down and let the stain coat the sides.
- Use a hairdryer to dry the stain.
- Decorate and enjoy!
Luv all things about You. Clever, talent, calmness and devotionals. Blessings GF
Thank you so much!
Where were the supplies purchased from?
Links to the supplies is under “supplies” on this post. Thank you!
I wonder if you could put the stained jars into a warm oven for a while instead of using a hairdryer. What do you think Melanie?
I use the mod pod he and food coloring method. After placing the coloring and modpodge turn your jar to completely cover. Turn upside down on a cooling rack to let mixture completely run out. Place in oven at 275° for about 15 to 20 minutes. Remove and cool.
This looks like a lot of fun. Thanks for sharing Melanie!
My grandparents had beautiful glass bottles in different shapes and colors. I always loved them. These brought back those memories.
How fun! I love it and I’m glad you have great memories.
I have vintage large light bulbs,(6″ long x 4″ round). I would like to do this process with the. Can you put the gel on the outside of the bulb and get similar results?
I’ve not tried that, but it seems like it would work just fine!
do you think this can be used for soap in a mason jar (since you can buy the mason jar lid pumps)? or maybe if I do the outside instead of the inside?
only if you do the outside as this is not a completely permanent finish.
thanks!
I saw you tutorial on painting Mason jar to look like stained glass and would like to know if there is a way to make them waterproof so they can be washed?
https://www.southerncrushathome.com/painting-glass-jars-diy-stained-glass-mason-jars-2/“>Painting Glass Jars – DIY Stained Glass Mason Jars